Leveraging ReactJS in HackerEarth Assessment Environment
ReactJS, as the name suggests, helps create reactive (read interactive) UIs. If we have a UI with many interactive elements and on each interaction a bunch of elements change, ReactJS efficiently updates and renders the required elements. At HackerEarth, one such UI is the programming assessment environment.
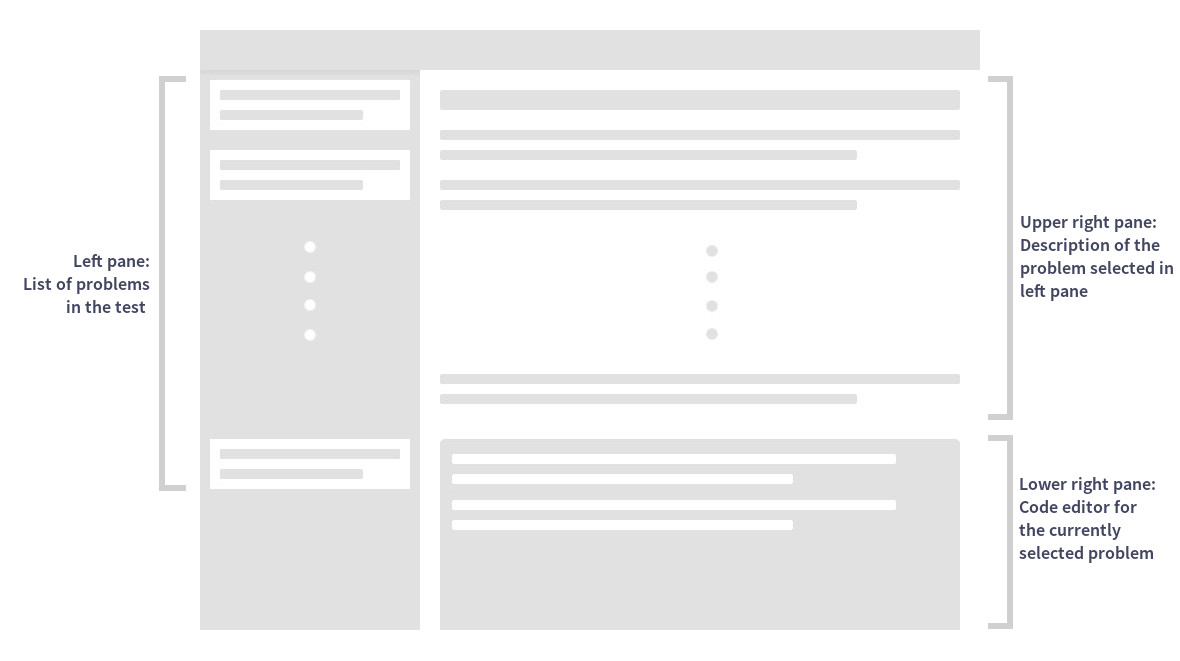
Programming assessment environment is one of the most critical products of HackerEarth. The mockup below is a broad idea of what it is composed of.
The system in place
Let’s briefly understand the components in the mockup above. There are three major components:
- The left pane
- This is the primary navigational part of the interface. This controls which question is visible in the right pane.
- It enables candidates to switch between questions as per their convenience.
- The upper right pane
- This contains the detailed description of the question which is selected in the left pane.
- The lower right pane
- This is a medium for the candidate to submit answer to the question above. As of now, we are assuming that we have a programming question. So let’s have a Code Editor here.
Now, let’s take a look at how things work in the current architecture.
In the first HTTP response, we render all the questions in the left pane. There’s no html in right pane. On selecting a question in left pane, an ajax call is made to fetch the data. The call returns a pre-rendered html of the entire question description, and it provides the candidate with a way to make further ajax calls to load the code editor. We won’t get into the details of each part of the question description, however, for now, let’s assume that it is composed of many smaller components.
When the candidate is ready to attempt the question, another ajax call is made to render the code editor. We have extended ace editor and written a wrapper over it to fit in our requirements. One such requirement is to record every keystroke and create a frame for it. Later, we can play all those frames and see the entire code editing session as a video. If that is of interest to you, read more about how we went about doing that.
Pain points in the current system
So far, we are good. Now, let’s talk about some of the pain points in the implementation above.
Every time we switch between questions using the list in the left pane, we make an ajax call to fetch that data. Now, mind that a candidate has, on an average, 1.5 hours to attempt the test. Assuming that this action of switching and re-rendering takes about 2 seconds and that there are about 20 questions in the test, a candidate is losing about 40 seconds (considering only 20 switches were made). As a candidate, you would also want to revisit each question in the end and go through your answers. 40 seconds seem like a small duration, however, imagine the frustration of waiting for 2 seconds for viewing the question.
Next comes the part where we load the code editor via ajax. Every time, a code editor is rendered, there is a list of files that are needed:
- Ace.js, the main component
- Mode files for each of the languages we support in our editor; it provides highlighting depending on the language
- Autocomplete files, again for all languages, help in providing realtime suggestions and completion of statements or functions
- CodePlayer.js, used to record keystrokes and frames to play as video
- AceWrapper.js, our own custom file, the final wrapper over Ace.js
Mode files, when combined and minified, used to take up more than 1000 KB. Autocomplete files up to 700 KB, Ace.js up to 400KB and CodePlayer.js & AceWrapper.js combined took about 50KB. So, on loading the code editor, we had to fetch more than 2 MB of data. This isn’t much of a problem, however, when companies went to conduct campus tests in universities in the remote areas where the Internet speed is about 10 MBPS, things didn’t work out well. Moreover, that bandwidth is shared among hundreds of candidates taking the test simultaneously. And, this again makes some more ajax calls to help render the correct code editor settings depending on the question.
Leveraging ReactJS to tackle the pain points
First, let’s solve the problem of an ajax request being made for every question switch made by the candidate. There were multiple thoughts around this. We can bring in the entire html of all the questions and simply hide/unhide at client side. This proved to be ineffective because the html was sized more than 5 MB for just 10 questions. So, this approach is out of the window.
Next, we thought of returning json instead of html and render it on the client side. Once, in the past, we used handlebars to facilitate this. However, we were open to exploring newer technologies and that’s when we stumbled upon ReactJS. After about 2 weeks of research and analyzing how we can fit ReactJS in our architecture, we decided to go ahead with it.
We knew it was still going to take some time to load the heavy ReactJS vendor files. So, we introduced a loader (inspired by GMail) while rendering the first HTTP response.

This gave us enough time to load all heavy js files and make some ajax calls. The json returned by ajax call was less than 100 KB for 30 questions. This was pretty good! We let React do what it does best and render the json on the client side.
Another beautiful feature of ReactJS is its ability to bind the rendered elements with the state of the elements. If we want to update the content or child elements of any element, we just update the state of the parent element and React will re-render the component. We will use the words element and component interchangeably; component refers to the js code of the html element.
When we create a complex web page with multiple action points, it in turn triggers another action in the interface and changes the interface. For instance, when a candidate answers a question in the right pane, we make changes in the left pane indicating that this question has been attempted. Instead of using tons of listeners for various actions and making changes in interface, just updating the state of the component will suffice in ReactJS.
Also, we have many different types of questions such as Programming, SQL, Android, etc. There are a lot of common child components among these components. Using React, we were easily able to reduce the code complexity and repetition by creating independent child components and reusing them to compose larger components.
Leveraging all these advantages of ReactJS, we were able to render all the questions at once in the test interface and hide/unhide the question depending on the selection in the left pane. This solved the first part of waiting for about 2 seconds for each question switch.
More complexity to the above structure
We have Multiple Choice Questions that come with a capability of having a timer per question. For example: The question description will not be visible to the user in the beginning (as shown in the image below). Once the user loads the question description, a timer will start for that particular question.

The problem with this is that we cannot send the question description in the initial ajax call to get the json. A smart candidate can see the response of the ajax request and the whole concept could have been a disaster. We made a compromise in this case and allowed ajax call to be made for each timed multiple choice question. However, this time around, we will not send the html from backend; we will still return json and update the state of one of the child components. Initially, it sounded like a troublesome problem, but the solution was quite easy. And this whole process of making ajax call to fetch json and re-rendering that child component did not take more than 200 ms.
Code Editor in ReactJS
The AceWrapper.js that we wrote had become quite messy over time, and it had become more like a legacy code that nobody dared to touch. After all, code editor is one of the primary user action elements and if that breaks, then we are doomed. We found that somebody had already written a React wrapper for Ace.js, react-ace. This was a good starting points for us, we forked it right away and wrote yet another wrapper component over it to facilitate our own requirements such as the code video player. Let’s keep the technicals of AceEditor in React for another day.
We ended up with a separate instance of AceEditor for every question. This did make the DOM a little heavy, however, the benefits listed below made us ignore this little problem.
- Save the state of the code written for any question.
- The state is saved even if the Internet is interrupted for a while.
- A candidate can still switch between questions and write code without having to worry that the code in another problem was not saved in our backend. We lazily update the database using the state of all the editor instances.
- The render time reduced from 4-5 seconds to 300 ms.
Wrapping up
Conclusions from the above discussion:
- We were able to avoid ajax calls to fetch each problem and decrease the time from ~2 seconds to ~200 milliseconds.
- The load time for the code editor was reduced from ~4 seconds to ~300 milliseconds.
- The React way of composing larger components using smaller components helped in writing reusable and maintainable code.
- We replaced tons of js listeners by writing handlers in specific React components.
- One downside is the initial load time, which fetches react and ace vendor js files.
Future scope of improvement
- We can try improving the initial load time, maybe we can create chunks of vendors depending on the type of test. For instance, if there are no programming questions in a test, we can avoid creating vendor files for ace.js.
- We can update the question in realtime while the candidate is taking the test. For instance, due to some reason, let’s say a question description was altered in the backend by test admin, we ask the candidate to reload the page. If we can push the change to all test taking candidates and update the state of that child, the test taking experience can be further enhanced.
If you’d like to have a first-hand experience of the test environment, go ahead and take this test. Let us know your feedback and how we can improve further.
Posted by Ravi Ojha · @ivarojha · Rookie’s Lab