Scaling Python/Django application with Apache and mod_wsgi
HackerEarth is primarily based on Python & Django. And we use Apache with mod_wsgi for hosting the application. There is a general complaint that Apache sucks when it comes to hosting Python web applications. It’s said that it’s slow, bloated, uses lots of memory and doesn’t perform very well. It’s also said that it doesn’t handle a high number of concurrent requests.
All that is true if you are not running the Python application in the right way. If configured properly, Apache works fantastically and is usually never the reason of slowness. That is almost always due to the application bottlenecks and database latency.
Now I am ashamed to admit that we have been running HackerEarth frontend servers for a long time under bad configuration of Apache and mod_wsgi. This came up when we started load testing our servers with thousands of concurrent connections. Also, we previously used to see the memory usage going on a rocket trajectory when faced with sudden spike in traffic, which used to force us to scale up more than that was actually required.
There are couple reasons for excessive memory usage when running Python applications in Apache. First of all, they are very heavy to start with. The multiprocessing module (apache2-mpm-prefork) that comes by default with apache makes it even worse. Their poor configuration is just waiting for disaster again. And most importantly, there are tons of apache modules installed and loaded into memory, while most of them are never going to be used.
If Apache is setup properly keeping the Python web application and the machine resource contraints into account, Apache is fast and reliable. I will explain further what we did at HackerEarth. But before that, I will present some real data from the experiments that we did.
We created an exact replica of one of our production machine - which directly handles the requests and is running Apache server. Then, we tweaked apached configuration one by one and recorded the improvement. Everytime we sent 5000 requests at 100 req/sec to the optimized machine, and also to one of the production machine. The results were unbelievable.
Stats with optimized apache configuration
Total: connections: 5000, requests: 4673, replies: 4626, test-duration: 64.938 s

Connection rate: 77.0 conn/s (13.0 ms/conn, <=1004 concurrent connections)

Request rate: 72.0 req/s (13.9 ms/req)

Errors: total 374 client-timo 369 socket-timo 0 connrefused 0 connreset 5
Errors: fd-unavail 0 addrunavail 0 ftab-full 0 other 0
This statistics tells that out of 5000 connections made, 4626 replies were received with timeout set to 10 secs. More importantly, 72 requests/sec were made and there were 1000+ concurrent connections at one time. We improved this metric further with errors ranging from 0-5 after further tweaking.
But let’s have a look at what happened on one of the production machine.
Stats with default apache configuration
Total: connections 2024 requests 363 replies 0 test-duration 94.801 s

Connection rate: 21.4 conn/s (46.8 ms/conn, <=1022 concurrent connections)

Request rate: 3.8 req/s (261.2 ms/req)

Errors: total 5000 client-timo 2024 socket-timo 0 connrefused 0 connreset 0
Errors: fd-unavail 2976 addrunavail 0 ftab-full 0 other 0
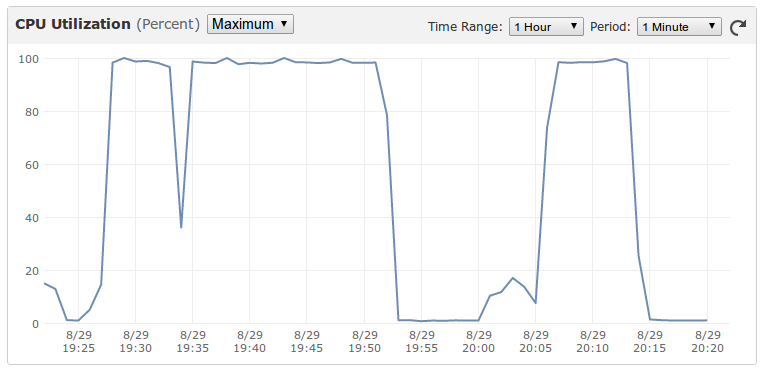
If you notice closely, you would say Holy Shit!. Without explaining in detail what happened here, it’s sufficient to say that at that number of requets, zero replies were received. The machine reported 100% memory and CPU utilization almost instantaneously after the requests were made. Apache didn’t know how to handle this situation and just went on creating more processes bringing everything to sandstill. This is how CPU utilization looked like, each time we sent some heavy requests to it.
Let’s go through the steps one by one to properly setup Apache and mod_wsgi.
1. Remove unnecessary modules
The first thing to do is to remove all the unnecessary apache modules that has been installed and are being loaded at runtime. At the end, only these modules should be enabled:
mod_alias.so
mod_authz_host.so
mod_deflate.so
mod_mime.so
mod_negotiation.so
mod_rewrite.so
mod_wsgi.so
You would also want to enable the following modules for debugging purposes. I will explain their usage later in this article. Although, you can skip them on production setup.
mod_status.so
mod_info.so
Before stripping down, as many as double the number of these modules were being loaded, including libphp5.so. Now why would we ever want to do that!
2. Use Apache MPM worker
Now purge apache2-mpm-prefork. It was built for PHP type applications which were not multi-thread safe. You can safely ditch it for the Python application, and only good days will follow.
On UNIX systems there are two main MPMs that are used. These are the prefork MPM and the worker MPM. The prefork MPM implements a multi process configuration where each process is single threaded. The worker MPM implements a multi process configuration but where each process is multi threaded.
On Ubuntu, you need to follow these steps:
sudo apt-get purge apache2-mpm-prefork
sudo apt-get install apache2-mpm-worker apache2-threaded-dev
You can read about MPMs in detail here.
3. KeepAlive Off
KeepAlive: Whether or not to allow persistent connections (more than one request per connection). Set to “Off” to deactivate.
KeepAlive can be turned off when you are not serving the static files with same server, where On mode is more beneficial. We serve static files from CloudFront, and so we decided to turn it off after doing dozens of experiments. You might have guessed the caveat is that for every request a new connection is created. But the advantage is that processes/threads are free to handle new requests instantenously rather than waiting for a request to arrive on the older connection.
4. Daemon Mode of mod_wsgi
By default, it’s usually always embedded mode + mpm-prefork, which is an absolute affliction if not understood properly. It’s best to set up mod_wsgi in daemon mode + mpm-worker and properly configure the MPM settings. We can get away with this setup almost always on a machine with limited memory and CPU cores. But embedded mode + mpm-prefork is less forgiving when encountered with sudden spike in traffic, it will keep creating processes and swamp the whole machine leaving it useless when you need it most.
When using daemon mode, the number of processes and threads is constant, which makes the resouce consumption predictable. Also with mod_wsgi running in daemon mode, when the Python web application is updated you just need to update the modification timestamp of WSGI file using touch. In embedded mode, you would have to restart the apache server. And try to do that when you are getting even a meagre 20 requests/sec on a production machine!
There is a fantastic post on this topic by Graham Dumpleton - the author of mod_wsgi. You can read this here.
5. Tweaking mpm-worker configuration
After doing several experiments on a replica of our production machine, we arrived at this configuration.
<IfModule mpm_worker_module>
    StartServers         2
    MinSpareThreads      10
    MaxSpareThreads      25
    ThreadLimit          25
    ThreadsPerChild      25
    MaxClients           75
    MaxRequestsPerChild   0
</IfModule>
This configuration enforces following rules:
- Initial number of server processes started is two.
- Maximum number of clients is restricted to 75.
- Each process has 25 threads.
- Maximum number of processes that could be created is 75/25 = 3.
- Our process size is ~220 MB (very very fat, I know!), so that means we only need ~660 MB in the worst case.
It turns out that our application is more CPU intensive than memory intensive in the way it’s written. So, we intentionally restricted the number of processes although we had much higher memory on the production box, so that we are ready for the worst case.
6. Check configuration
The two modules mod_status.so and mod_info.so can be used for direct information as how the apache is being run. Put this snippet in your httpd.conf file.
<Location /server-status>
SetHandler server-status

Order Deny,Allow
Allow from all
</Location>

<Location /server-info>
SetHandler server-info

Order Deny,Allow
Allow from all
</Location>
Now access http://yourdomain.com/server-info/. It will show page with following information, in addition to tons of other useful info.
Loaded Modules:
mod_wsgi.c, mod_status.c, mod_rewrite.c, mod_negotiation.c, mod_mime.c, mod_info.c, mod_deflate.c, mod_authz_host.c, mod_alias.c, mod_so.c, http_core.c, worker.c, mod_logio.c, mod_log_config.c, core.c

Server Settings
MPM Name: Worker
MPM Information: Max Daemons: 3 Threaded: yes Forked: yes
http://yourdomain.com/server-status/ will give information about the running server status.
Current Time: Thursday, 21-Nov-2013 03:08:29 CST
Restart Time: Thursday, 21-Nov-2013 00:27:16 CST
Parent Server Generation: 0
Server uptime: 2 hours 41 minutes 13 seconds
Total accesses: 5798 - Total Traffic: 56.5 MB
CPU Usage: u17.8 s7.75 cu.01 cs0 - .264% CPU load
3.1 requests/sec - 6.0 kB/second - 10.0 kB/request
6 requests currently being processed, 19 idle workers
All this signifcantly reduced the number of servers we had to run and made the application more stable and resilent to traffic bursts. Besides these, we have done tons of optimizations in the application itself and written it in a very distributed fashion. The frontend application server is just 10% of the whole server stack, but it’s the most important as it interfaces directly with website user. I will talk about other optimizations very soon which has enabled us to comfortably adapt to sudden burst in traffic without any sweat.
(We might have been sweating because we were in our weekend dance class while all
servers were getting bombarded :D)
On a related note, you might be interested in reading engineering behind our database scaling.
Let me know if you have any comments, suggestions or any potential quirks in what all I have written here. Besides if you are passionate about solving such problems everyday, we are hiring.
Posted by Vivek Prakash. Follow me @vivekprakash. Write to me at vivek@hackerearth.com.